https://righttrackwebsolutions.com/blogs/the-greenhouse.atom Ferry-Morse - The Greenhouse 2024-09-12T10:24:47-04:00 Ferry-Morse https://righttrackwebsolutions.com/blogs/the-greenhouse/recipe-mini-cucumber-sandwiches 2024-08-07T16:27:10-04:00 2024-08-12T15:26:37-04:00 Recipe - Mini Cucumber Sandwiches PageFly https://righttrackwebsolutions.com/blogs/the-greenhouse/cucumber-popsicles 2023-11-21T15:38:22-05:00 2024-03-04T15:10:04-05:00 Cucumber Popsicles Shopify API Cucumber popsicles are a delightful and refreshing treat that combines the crisp, hydrating qualities of cucumbers with the sweet and icy goodness of popsicles. These unique frozen delights are a perfect way to beat the heat on a hot summer day. Cucumber popsicles offer a delightful fusion of flavors, where the natural coolness of cucumbers meets the sweetness of the frozen popsicle form. Their vibrant green hue and invigorating taste make them an enticing option for anyone seeking a cool, revitalizing snack or dessert. In this introduction, we'll dive into the world of cucumber popsicles, exploring their ingredients, preparation methods, and the wonderful ways in which they can provide a welcome respite from the sweltering weather.

More

]]>
https://righttrackwebsolutions.com/blogs/the-greenhouse/garden-fresh-stuffed-peppers 2023-08-08T11:54:31-04:00 2023-09-25T14:59:37-04:00 Garden Fresh Stuffed Peppers Shopify API https://righttrackwebsolutions.com/blogs/the-greenhouse/garden-fresh-roasted-potatoes-and-carrots 2023-08-08T11:44:31-04:00 2023-09-25T15:02:35-04:00 Garden Fresh Roasted Potatoes and Carrots Shopify API https://righttrackwebsolutions.com/blogs/the-greenhouse/garden-fresh-summer-sweet-corn-and-basil-salad 2023-08-03T09:55:19-04:00 2023-08-17T02:18:31-04:00 Garden Fresh Summer Sweet Corn and Basil Salad Shopify API https://righttrackwebsolutions.com/blogs/the-greenhouse/garden-fresh-grilled-summer-squash 2023-07-27T09:36:58-04:00 2023-09-25T15:04:59-04:00 Garden Fresh Grilled Summer Squash Shopify API https://righttrackwebsolutions.com/blogs/the-greenhouse/garden-fresh-quick-pickles 2023-07-20T16:17:31-04:00 2023-09-25T15:09:05-04:00 Garden Fresh Quick Pickles Shopify API https://righttrackwebsolutions.com/blogs/the-greenhouse/garden-fresh-herb-dip 2023-07-17T16:02:21-04:00 2023-09-25T14:56:38-04:00 Garden Fresh Herb Dip Shopify API https://righttrackwebsolutions.com/blogs/the-greenhouse/garden-fresh-pink-lemonade 2023-07-17T15:26:42-04:00 2023-09-25T15:07:16-04:00 Garden Fresh Pink Lemonade Shopify API https://righttrackwebsolutions.com/blogs/the-greenhouse/home-grown-tomato-bruschetta-recipe 2023-04-12T13:23:30-04:00 2023-09-25T14:51:59-04:00 Home-Grown Tomato Bruschetta Shopify API https://righttrackwebsolutions.com/blogs/the-greenhouse/pimms-cucumber-cup-recipe 2023-04-12T13:22:40-04:00 2023-09-25T14:48:31-04:00 Pimm's Cucumber Cup Shopify API https://righttrackwebsolutions.com/blogs/the-greenhouse/our-top-5-vegetable-sides-for-potluck-parties 2019-12-18T09:55:00-05:00 2022-03-17T19:22:04-04:00 Recipes | Our Top 5 Vegetable Sides for Potluck Parties Ashley Phillips More

]]>

Recipes | Our Top 5 Vegetable Sides for Potluck Parties

Need new ideas to impress everyone at upcoming gatherings? We've got you covered with tweaks to your favorite classics and new recipes to try for work potluck parties, ugly sweater dinner festivities and holiday feasts. 


Always remember your audience!

You want to make sure you make something that all, or most people can eat. If you can, choose gluten free options. Remember, gluten free breadcrumbs can always be substituted for regular.  There's always the option to serve cheese on the side if you know your friends have dairy restrictions also.  Happen to have a lot of vegetarians in your office? We have some options that have no meat included as well! It's important for a potluck to have variety, which is why our shoppable list is far from ordinary.


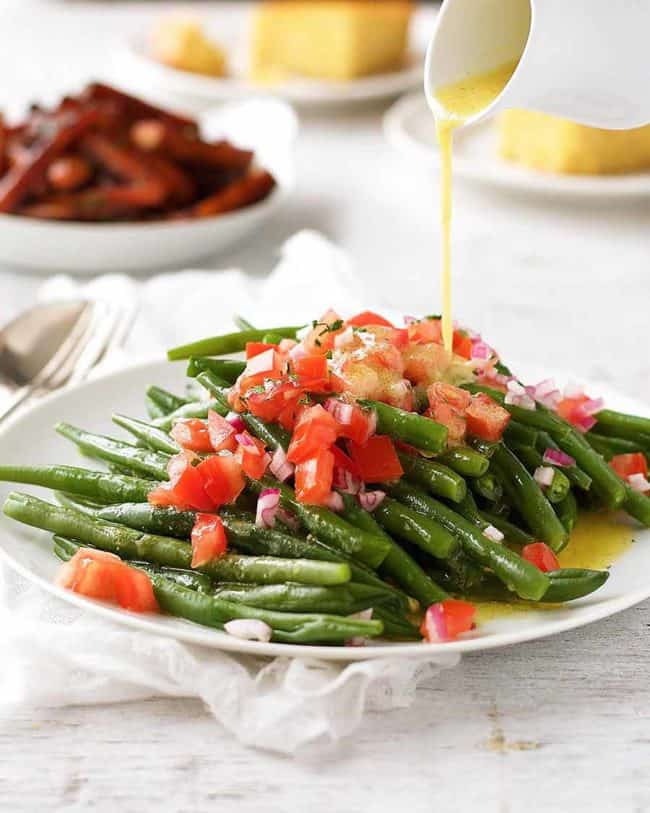
1. Green Bean Salad - Fresh, quick and easy!

10 Minute Prep | 3 Minute Cook 
Ingredients

  • 1 lb green beans, trimmed
  • 1/4 red onion, finely diced
  • Finely chopped parsley 
Dressing
  • 1 1/2 tbsp lemon juice (or white wine vinegar)
  • 3 - 4 tbsp extra virgin olive oil (adjust to taste)
  • 1 tsp dijon mustard
  • 1 garlic clove 
  • Salt and pepper
  • 1-2 roma tomatoes, diced
Instructions
  1. Combine the Dressing ingredients in a jar and shake well. Set aside - or refrigerate up to 2 days. Bring to room temperature before using. 
  2. Bring a large pot of salted water to boil. Add the beans, bring it back up to a boil and boil beans for 60 seconds - no more! 
  3. Drain and plunge in ice cold water (or run under cold tap water) to stop them from cooking. 
  4. If making ahead, leave in the colander to dry before transferring to the fridge. 
  5. To serve, pile the beans on a plate, top with tomato and red onion, drizzled over dressing. Sprinkle with parsley if using.

Nagi. "Green Bean Salad." Recipe Tin Eats. 9 Nov. 2019. https://www.recipetineats.com/green-bean-salad/


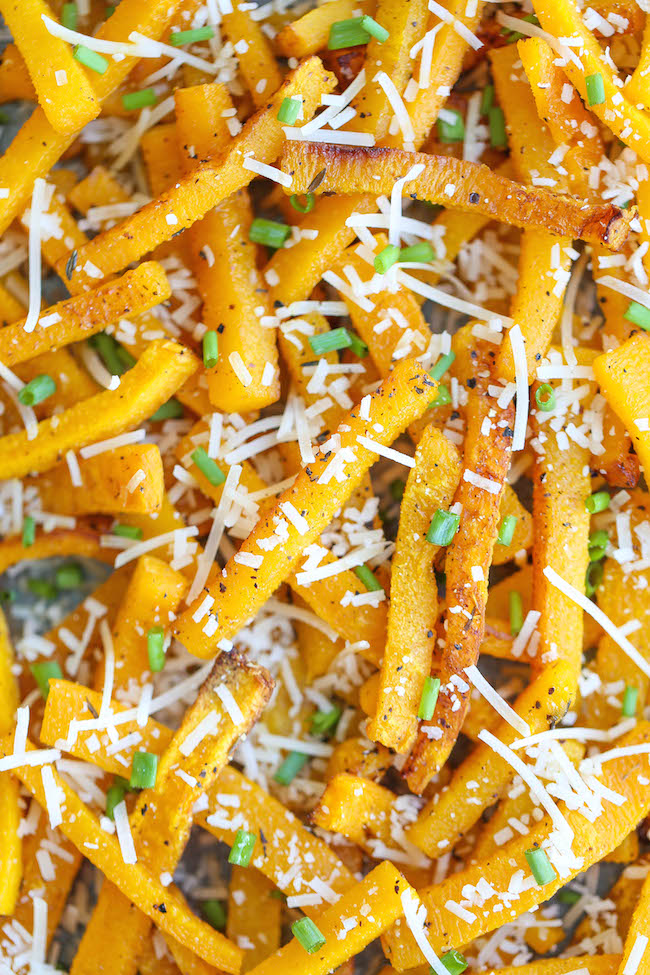
2. Parmesan Butternut Squash Fries - A classy spin on a crowd pleaser.

15 Minute Prep | 30 Minute Cook
Ingredients

  • 1 medium butternut squash, peeled, seeded and cut into 1/2-inch thick matchsticks 
  • 1 tablespoon olive oil 
  • 1/2 teaspoon dried thyme 
  • 1/2 teaspoon dried oregano 
  • Pinch of cayenne pepper 
  • Kosher salt and freshly ground black pepper, to taste 
  • 1/4 cup freshly grated Parmesan cheese 
  • 2 tablespoons chopped fresh chives
Instructions
  1. Preheat oven to 425 degrees F. Coat a cooling rack with nonstick spray and place on a baking sheet; set aside. 
  2. Place butternut squash in a single layer onto the prepared baking sheet. Add olive oil, thyme, oregano and cayenne pepper; season with salt and pepper, to taste. Gently toss to combine. 
  3. Place into oven and bake for 25-30 minutes, or until golden brown and crisp.* 
  4. Serve immediately, topped with Parmesan and garnished with chives, if desired.

Chungah. "Parmesan Butternut Squash Fries." Damn Delicious.  17 Oct. 2015. https://damndelicious.net/2015/10/17/parmesan-butternut-squash-fries/

3. Cheesy Bacon Jalapeno Corn Dip - Not your average party dip.

10 Minute Prep | 20 Minute Cook

Ingredients

  • 8 strips bacon 
  • 2 (11 oz) cans whole kernel sweet corn, drained 
  • 1 jalapeno, seeded and minced 
  • 8 oz cream cheese, softened 
  • 1 cup mozzarella cheese, shredded 
  • 1/2 teaspoon salt 
  • Dash of cayenne pepper 
  • 1/4 cup fresh basil, chopped 
  • Parmesan cheese, to taste
Instructions

Preheat oven to 400 degrees F. 
In a cast iron or ovenproof skillet, cook the bacon over medium heat until slightly crispy. Remove from heat and set on paper towels to absorb excess grease. Drain off all but 1 teaspoon of the grease remaining in the pan. We want to use the bacon grease to grease the pan and add more bacon flavor to the dip. Crumble the bacon. 
Combine the corn, jalapeno, cream cheese, mozzarella, salt, cayenne, half of the bacon, and half of the basil. Scoop into the skillet and bake for 20 minutes. 
Sprinkle with the remaining bacon and basil, and parmesan cheese to taste. Serve immediately.

Morgan. "Cheesy Bacon Jalapeno Corn Dip." Host the Toast. 25 Aug. 2014. https://hostthetoast.com/cheesy-bacon-jalapeno-corn-dip/

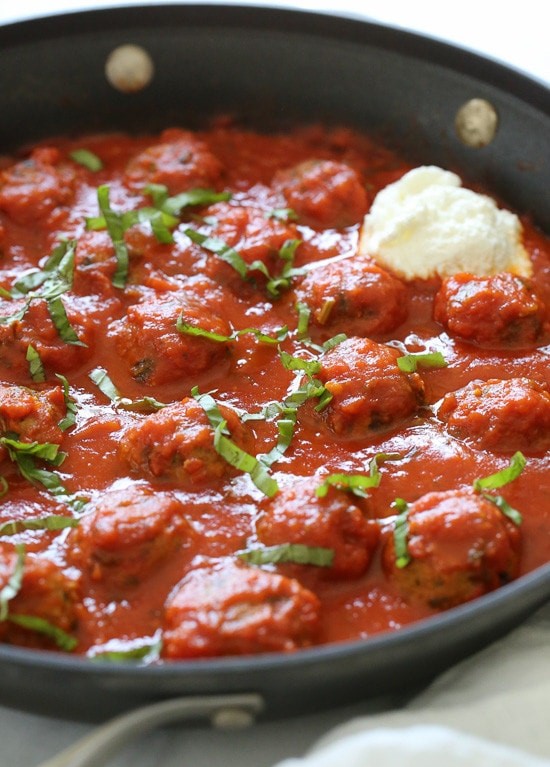
4. Eggplant "Meatballs" - A vegetarian take on classic comfort food.

20 Minute Prep | 30 Minute Cook
Ingredients

  • 1/2 tbsp olive oil 
  • 1 1/4 lbs unpeeled eggplant, cut into 1-inch pieces 
  • salt 
  • 1/4 tsp black pepper 
  • 2 garlic cloves, crushed 
  • 2 tbsp chopped basil, plus leaves for garnish 
  • 1 1/2 cups Italian seasoned breadcrumbs 
  • 1 large egg, beaten 
  • 2 ounces Pecorino Romano cheese, freshly grated, plus more for serving 
  • 1 tablespoon chopped flat-leaf parsley 
  • 1 25.25 ounce jar tomato sauce (homemade or store-bought)
  • part skim ricotta cheese, for serving (optional)
Instructions
  1. Heat the oven to 375°F. Spray a large rimmed baking sheet with cooking spray. 
  2. Place 1/2 tablespoon olive oil in a large nonstick skillet over medium high heat. When hot add the eggplant and 1/4 cup water. Season with salt and pepper to taste and cook, stirring occasionally until tender, 10 to 12 minutes. Transfer to the bowl of a food processor and pulse a few times. 
  3. Transfer to a bowl and add bread crumbs, beaten egg, Romano cheese, parsley, garlic and chopped basil into the eggplant. Season with 1/2 teaspoon kosher salt and 1/8 teaspoon of pepper. 
  4. Form the eggplant mixture into 24 balls about 1 1/8 oz each, rolling tightly and transfer to the prepared baking sheet. Bake until firm and browned, about 20 to 25 minutes. 
  5. Heat the sauce in a large deep skillet to warm the sauce. Add the meatballs to the sauce and simmer for 5 minutes. Garnish the meatballs with basil leaves and serve with ricotta cheese if desired.

Homolka, Gina. "Eggplant Meatballs." Skinny Taste. 6 Jul. 2015. https://www.skinnytaste.com/eggplant-meatballs/

5. Zucchini & Squash Bake - Crispy & delicious!

15 Minutes Prep | 35 Minute Cook 

Ingredients

  • 2 lbs summer squash zucchini and yellow squash, cut into ¼-inch slices
  • 2 ½ Tbsp olive oil
  • 1 ¼ tsp salt divided
  • ½ tsp pepper
  • ⅓  cup Parmesan cheese grated 
  • ⅓ cup Panko breadcrumbs 
  • ¼ tsp. garlic powder
  • 2 Tbsp fresh parsley finely chopped
Instructions
  1. Preheat oven to 350 degrees.
  2. Cut yellow squash and zucchini into thin, ¼-inch slices.
  3. Sprinkle ½ teaspoon salt over the zucchini and squash slices. Let sit for 10 minutes and then dab to remove excess moisture with a paper towel.
  4. Spray a 9-inch square baking dish with non-stick cooking spray. 
  5. Alternatively, overlap the zucchini and squash in a row. You should be able to form 4 rows.
  6. Drizzle olive oil over the zucchini and squash and then sprinkle with salt and pepper. 
  7. In a small bowl combine Parmesan cheese and breadcrumbs. Toss to combine and then sprinkle over the zucchini and squash.
  8. Cover baking dish with aluminum foil and bake in preheated oven for 30 minutes.
  9. Remove foil and turn heat to a High broil. Broil for an additional 5-7 minutes, or until breadcrumb topping starts to turn a golden brown.
  10. Serve immediately with fresh parsley and enjoy!

London. "Healthy Summer Squash Casserole." Evolving Table.  https://www.evolvingtable.com/healthy-summer-squash-casserole/


Shop The Recipe With Ferry Morse Seed

Want to go garden to table? All of these recipes use vegetables that you can grow right at home with Ferry Morse seed so you can save these recipes and cook fresh all throughout the year. Founded in 1856, Ferry Morse is the oldest running seed company in America! Our seeds are trusted, fresh and easy to plant. Check out the links below to help grow these recipes whenever your grow season may be!

Tomato Roma VF Seed

ROMA TOMATO VF SEED

€1.79

Onion Sweet Spanish Yellow Utah Jumbo Seed

GREEN BEAN TENDERGREEN IMPROVED

€2.49

Basil Genovese Seed

PARSLEY ITALIAN

€1.99

Tomato Roma VF Seed

SQUASH WALTHAM BUTTERNUT

€1.99

Onion Sweet Spanish Yellow Utah Jumbo Seed

CHIVES (SOW EASY)

€2.49

Basil Genovese Seed

SWEET CORN SILVER N GOLD

€2.49

Oregano Seed

PEPPER JALAPENO MILD

€1.99

Pepper Long Thin Cayenne Seed

BASIL MAMMOTH

€1.99

Chives Garlic Seed

EGGPLANT BLACK BEAUTY

€2.19

Oregano Seed

SQUASH DARK GREEN ZUCCHINI

€2.49

Pepper Long Thin Cayenne Seed

SQUASH EARLY PROLIFIC STRAIGHTNECK
€1.99

Chives Garlic Seed

  OREGANO

€1.99


Share On Social

Share your garden to table recipes and creations with us by tagging us on social media!

#MyFerryMorse

]]>
https://righttrackwebsolutions.com/blogs/the-greenhouse/tomato-bisque-from-scratch 2019-09-18T08:42:15-04:00 2022-03-17T19:21:49-04:00 Recipe | Tomato Bisque From Scratch Jackie Huynh More

]]>

Recipe | Tomato Bisque From Scratch

A rich tomato bisque can be one of the most satisfying and comforting dishes, especially on a cool day when the warmth is that much more precious. Making it at home is an extra fresh and flavorful way to enjoy your garden-picked tomatoes, but most recipes you'll find call for store-bought tomato pastes. Tomato pastes are a bit of a shortcut for thickening up and concentrating a tomato bisque, but canned pastes just won't deliver the same freshness as a freshly picked tomato.

The good news: you can ditch the cans. By  roasting and simmering your tomatoes, you can achieve all of the richness and flavor without reaching for the can. 


Soup Vs. Bisque

Before we go further, it's worth giving a quick background on the difference between soup and bisque. There is a difference, but if you're not clear on what that difference is, don't be embarrassed, the lines are admittedly kind of blurry.

Tomato Soup is a liquid food, typically served warm/hot, made from tomatoes, other vegetables and water or stock. Simple.

Tomato Bisque is a creamy, highly seasoned tomato soup, traditionally made with crustacean broth (called coulis in French). Bisque also typically includes the addition of heavy cream as well. In modern usage, "bisque" is used a lot more broadly to essentially mean any creamy, pureed soup. A modern bisque doesn't necessarily include crustacean broth or even cream, the term "bisque" refers mostly to the creamy texture and rich seasoning.

So, when you add it all up, bisque is technically just a type of soup! We're calling this recipe a bisque because it's pureed, includes cream, and has that rich and flavorful seasoning that speaks to it's French origins. 


The Recipe
Serves 4 | 15 Minutes Prep | 75 Minute Cook

This tomato bisque recipe is simple and most of the time you'll spend on it is passive, allowing your oven to do most of the work. The main elements to this dish are the roasted tomatoes and the caramelized onions, which are pureed and brought together in a large pot with seasoning and a touch of cream. The result is a rich, creamy tomato bisque with a natural sweetness and balanced acidity. It's the kind of dish that's simple enough to serve as a side, or with a grilled cheese sandwich, but you'll also find that this bisque is full-bodied enough to stand alone as a meal all to itself. 

Scale up or down the recipe with ease (in case you want to give yourself a longer lasting supply). This is also the kind of dish that will hold up well to freezing. So, if your harvest was especially robust this year, you can set yourself up for some warm meals on cold Fall and Winter days, without letting any of your garden produce go to waste.

Ingredients

2 lbs roma or plum tomatoes
(Approximately 10 roma tomatoes or 18 plum tomatoes)
4 cloves garlic (peeled)
3 tbsp olive oil
Salt and Pepper
1 Large yellow onion
1/2 cup basil leaves
1/2 tsp dried oregano
1/4 cup heavy cream
1 pinch cayenne pepper

Optional Garnishes: Parmesan cheese, sour cream, pine nuts, chives


TIP: Slightly overripe is the ideal condition for making tomato soups and sauces. They'll be a touch sweeter and the flesh will break down more easily to create a smooth texture.


Supplies

Baking sheet
Parchment paper
Large pot
Food processor, blender or immersion blender

1. Roast

Preheat oven to 400 degrees F.

Line a large baking sheet with parchment paper. 

Place halved tomatoes and chopped garlic on the baking sheet with 3 tbsp olive oil, salt, pepper, cayenne and oregano. 

Roast in the oven for 45 minutes.

2. Caramelize

While the tomatoes and garlic roast, the onions will get another treatment. 

Add 1/2 tbsp olive oil to a large pot over medium heat. 

Add sliced onions and stir occasionally for 15 minutes, or until the onions are fully caramelized and appear golden. 

3. Blend

After the tomatoes are roasted and the onions are caramelized, let the ingredients cool for 10 minutes.

Add tomatoes and garlic to blender and blend until smooth. 

Add caramelized onions and basil and blend again. 

4. Simmer

Transfer the blended mixture back to the large pot. 

Add oregano and simmer on medium low heat for 10 minutes.

In the final minute of simmering, add in heavy cream, just long enough to incorporate it, but avoiding burning.

5. Garnish and Serve

Once the mixture has cooled to a palatable temperature, you can pour into serving bowls and garnish with basil leaves.

You may also garnish with grated Parmesan cheese, a dollop of sour cream, chopped chives, a drizzle of olive oil, or even toasted pine nuts. 

Serve and enjoy!


Shop The Recipe

Want to go garden to table? You can grow these ingredients from scratch.

Tomato Roma VF Seed

ROMA TOMATO VF SEED

€1.79

Onion Sweet Spanish Yellow Utah Jumbo Seed

ONION SWEET SPANISH SEED

€1.99

Basil Genovese Seed

BASIL GENOVESE SEED

€1.99

Oregano Seed

OREGANO SEED

€1.99

Pepper Long Thin Cayenne Seed

PEPPER CAYENNE SEED
€1.99

Chives Garlic Seed

CHIVES GARLIC SEED

€1.99


Share On Social

Share your garden to table recipes and creations with us by tagging us on social media!

#MyFerryMorse

]]>
https://righttrackwebsolutions.com/blogs/the-greenhouse/6-surprising-vegetable-smoothies 2019-09-13T15:24:26-04:00 2022-03-17T19:21:31-04:00 6 Surprising Vegetable Smoothie Recipes Jackie Huynh More

]]>

6 Surprising Vegetable Smoothie Recipes

Drinking vegetables can sound like a bitter pill sometimes. Even for the most fanatic veggie lovers, a cup full of astringent greens can be a little bit intimidating, but if you strike up the right combination of greens, fruits and add-ins, a vegetable smoothie can be refreshing and downright appetizing. Vegetable fanatics and critics alike can find something to love in a vegetable smoothie. These combinations will make you forget that you're actually getting a daily dose of vegetables in a glass. It's also a clever way to use up some of those extra vegetables you harvested this season- especially the ones that you stowed away in the freezer! (For more on preserving vegetables, including freezing methods, click here)

We're offering up 6 delicious vegetable smoothie recipes that combine some surprising ingredients to bring out the best in your veggies. These recipes require very little prep and can be put together in 5 minutes or less- so, no excuses for skipping breakfast, no matter how late you're running for work.

The Recipes

The main elements of a well-rounded smoothie are the fruits, the vegetables, herbs or spices, and your preference of nut milk. There's always room for nutritional add-ins like chia seeds, hemp hearts, and shredded coconut too, so don't hesitate to add in your own twist to the recipes.

Instructions

These recipes are written to yield 1 serving. 
Blend and enjoy. Easy.

Avocado and Spinach Green Smoothie Recipe

AVO + GREENS

1/2 Cup Spinach
1/4 Avocado
1/2 Banana (Frozen and sliced)
1 Tsp Chia Seeds
1 Cup Nut Milk (recommended: Almond)

Zucchini Bread Green Smoothie Recipe

ZUCCHINI BREAD

1 Banana (Frozen and Sliced)               
1/2 Cup Zucchini (Peeled and chopped)
2 Tbsp Almond Butter                
1/2 Tsp Ground Cinnamon                 
1 Cup Nut Milk (recommended: Almond)

Kale and Broccoli Mango Green Smoothie Recipe

KALE + BROCCOLI

1/2 Cup Honeydew
1/2 Cup Kale
1/2 Cup Broccoli Florets
2 Sprigs Mint
1/2 Lime (Juiced)
1 Cup Nut Milk (recommended: Coconut)

Spiced Carrot Cake Vegetable Smoothie Recipe

CARROT CAKE

1 Cup Chopped Carrots (Steam if your blender can't handle raw carrots)
1/2 Cup Banana (Frozen and sliced)
1/4 Cup Frozen Pineapple
2 Tbsp Flaked Coconut
1/2 Tsp Ground Cinnamon
1 Cup Nut Milk (recommended: Cashew)

Hot Jalapeno Pepper Spinach Green Smoothie Recipe

HOT GREENS

1 Banana (Frozen and sliced)
2 Cups Spinach
1 Cup Mango
1/2 Tsp Jalapeno (Chopped and seeds removed)
1 Lime (Juiced)
1 Nut Milk (recommended: Coconut)

Butternut Squash Smoothie Recipe

BUTTERNUT SQUASH

1/2 Cup Cooked Butternut Squash
1/2 Banana (Frozen and sliced)
1/2 Cup Frozen Mango
1" Piece of Ginger (peeled and grated)
1/2 Tsp Turmeric
1 Cup Nut Milk (recommended: Almond)


The Benefits

We've been told all our lives to eat more vegetables, so vegetable smoothies might seem like a no-brainer, but here are some health benefits you might not have considered:

Consume More Vegetables

This one is a given. Even if you are a serious vegetable fanatic, drinking a cup of a colorful smoothie is just plain easier than cooking up a whole dish. A vegetable smoothie in the morning can help give you a head start on your recommended daily dose of 3 Cups of veggies. 

Trick Your Taste Buds

If you happen to struggle to enjoy the earthy, bitter flavors of some vegetables, blending them up with other fruits and flavors can really make you forget that your tasting vegetables at all. 

Form a Habit

If you happen to struggle to enjoy the earthy, bitter flavors of some vegetables, blending them up with other fruits and flavors can really make you forget that your tasting vegetables at all. On top of that, eating whole and raw foods without added sugar trains your body to crave less sugar and processed fats. Your not-so-healthy cravings can really lose their edge, and if you are working on weight loss goals, this can make all the difference. 

Vitamins

Compared to your average fruit-only smoothie, vegetable smoothies, especially ones with leafy greens, tend to be a richer source of Iron, Magnesium, B-Vitamins, Vitamin E, and Folate.  These vitamins are beneficial to your body and mind at large, but especially beneficial for your immune system, hair, skin, bones, and even mental clarity.

Share On Social

Share your garden to table recipes and creations with us by tagging us on social media!

#MyFerryMorse


]]>
https://righttrackwebsolutions.com/blogs/the-greenhouse/quick-refrigerator-dill-pickle 2019-07-30T15:06:00-04:00 2024-08-12T13:49:07-04:00 Quick Refrigerator Dill Pickle Recipe Alex Nendza More

]]>

Quick Refrigerator Dill Pickles

Prep Time: 10 minutes | Servings: 9 

When harvest finally hits and you're inundated with fresh cucumbers, there are only so many you can chop up for salads and garnishes. Whether you're pickling out of sheer necessity for preservation, or because you have a pickle obsession, pickling is very easy to do at home. How easy? This method of pickling will only take about 10 minutes to prepare and will yield tasty pickles overnight without requiring any special equipment! 

Why use the refrigerator method?

What always kept me from attempting pickling at home was the wait time. I always assumed that making delicious pickles required lots of planning and waiting or might require some special machine or fancy jars. Discovering the quick refrigerator method changed my perception. As soon as a I realized how easy it was, I got straight to work so I could satisfy my craving without having to wait around.

Note: Refrigerator pickles aren't shelf-stable, but so long as they are kept refrigerated, they should last for up to 6 weeks (more than enough time to eat them up).

Shop The Recipe

The line-up

Ingredients for home made dill pickles

Prep Time: 10 minutes | Servings: 9  

INGREDIENTS  

5-7 pickling cucumbers (sliced)
Recommended variety: Boston Pickling
1 Cup white vinegar
2 Cups water
2 Tbsp kosher salt
6 Dill sprigs
1 Tbsp sugar (optional)
1/2 Head of garlic (peeled and smashed)
5 Peppercorn kernals

EQUIPMENT

Refrigerator
2 Quart sized jars (a great opportunity to re-use glass mason jars, recycled pasta sauce jars or other re-usable sealing containers)

the playbook

Step One: Slice and Dice

- Slice cucumbers into thin slices or spears (according to preference)

- Peel, then smash or chop garlic

- Chop dill (medium coarseness)

Chopped dill for cucumber pickling
Making home made pickle brine with dill and garlic

Step Two: Brine

- Combine water, vinegar salt, garlic, pepper, dill and sugar (optional) in medium bowl

- Stir until sugar and salt have dissolved 

- Taste and adjust as needed (according to preference)

Step Three: The Transformation

- Add sliced cucumbers to jars

- Pour in brine (If the brine doesn't completely cover the cucumbers, don't worry. The salt will pretty quickly extract the extra liquid from the cucumbers)

- Seal up the jars and give them a good shake

- Place jars in the refrigerator

- Shake jars every 2-3 hours for good measure

Home pickling jars with cucumbers
Home made pickles on pulled-pork sandwich

Step Four: Wait... (but not long)

- After about six hours in the fridge, give or take, the pickles will reach their full saturation and will be ready to eat!

- If they don't seem quite complete, they may take a few extra hours to reach full flavor (this depends on the salt and vinegar content of the brine as well as the thickness of the cucumber)

- Keep refrigerated

- Serve on sandwiches, with a charcuterie board or eat them straight out of the jar

Step Five: Pickle Everything

Once you've picked up this new skill, you'll be dying to try your hand at all kinds of pickling. The good news is: this pickling method can be applied to a wide variety of vegetables. You may also like to experiment with adding other spices and herbs, or even different types of vinegar.

Some other vegetables that take well to pickling:
Carrots
Jalepenos
Okra
Radishes
Green Beans
Onions
Cauliflower
Cabbage
Cherry Tomatoes

Home pickling various vegetables

Shop Pickling Vegetables and Herbs

]]>
https://righttrackwebsolutions.com/blogs/the-greenhouse/garden-to-table-mint-mojito-recipe-copy 2019-04-09T16:48:00-04:00 2024-08-12T13:51:51-04:00 Garden To Table Mint Mojito Recipe Alex Nendza More

]]>

Garden To Table Mint Mojito

Mojitos are the quintessential, iconic warm-weather cocktail because the fresh, bright flavors and bubbly effervescence have a way of cooling you down and picking you up. There have been many takes on the Mojito, but it needs no over-complication or complete flavor overhaul. It's a simply drink and it's simply delightful.

So how do you take the Mojito to the next level? Grow it from ground up in your garden. Use the Mixologist Gardening Kit from Ferry-Morse to grow fresh mint and cucumbers in your own garden. After spending the afternoon working in the garden, you'll have earned a drink.

Follow along with the recipe below and enjoy!

THE LINE-UP

Ferry Morse Mixologist Garden Kit


Makes 1 Pitcher (4 servings)

INGREDIENTS  

8 oz White Rum
1/2 Cucumber
3/4 Cup Mint
4 Tsp Simple Syrup or 2 tsp raw sugar
4 Tsp Lime Juice
16 oz Club Soda
Ice

EQUIPMENT
10 oz highball glasses make the best, most classic presentation for a mint mojio.

Large Pitcher


THE PLAYBOOK

Step One: Chop It Up

Pick the mint leaves from their stems until you've piled up about 3/4 cup of loosely packed leaves. Now give them a quick rinse.

To get the most flavor out of the fresh mint, chop them coarsely. Save a few whole mint leaves for garnishing at the end.

Slice 1/2 cucumber into moderately thin slices.

Cut the limes into easily-squeezable quarters.

Ferry Morse Mixologist Garden Kit


Step Two: Combine

In pitcher with ice, pour in 8 oz Rum.

Add 4 tsp. simple syrup

Squeeze in lime juice (toss in the lime quarters too if so desired)

Add chopped mint leaves

Add cucumber slices


Step Three: Get Bubbly

Stir the pitcher to incorporate all of the ingredients. Keep the pitcher refrigerated.

When ready to serve, pour 3 oz. of the cocktail mixture into a glass with ice. 

Fill the rest of the glass with club soda.

Give it a quick stir and garnish with whole mint leaves and a lime slice.

Enjoy!

Ferry Morse Mixologist Garden Kit

GROW IT YOURSELF

Ferry Morse Mixologist Garden Kit

Ferry Morse Mixologist Gardening Kit
Try growing our Mixology kit to come up with a variety of home-grown cocktail recipes. 

Kit Includes:

  • 1 Mint Seed Packet
  • 1 Organic Basil Sweet Seed Packet
  • 1 Strawberry Alpine Seed Packet
  • 1 Lavender True (Sow Easy)
  • 1 Organic Thyme Seed Packet
  • 1 Cucumber Straight Eight Heirloom
  • 1 Jiffy 72 Pellet Professional Greenhouse
]]>
https://righttrackwebsolutions.com/blogs/the-greenhouse/indoor-herbs-to-spice-up-your-winter-gardening 2019-01-03T12:00:00-05:00 2023-09-25T15:15:04-04:00 Indoor Herbs to Spice Up Your Winter Cooking Alex Nendza It's now January and some days, the walk from my door to my car is just about all the exposure I can handle. I haven't put a full-stop on my gardening though, I've just brought things indoors. My favorite thing to garden indoors: herbs.

More

]]>
The Winter Gardening Dilemma

Unless you live in the southern third of the United States, you've probably been limiting your time outside this winter. It's now January and some days, the walk from my door to my car is just about all the exposure I can handle. 

I haven't put a full-stop on my gardening though, I've just brought things indoors. My favorite thing to garden indoors: herbs. They beautify my home and add flavor to my dishes. Keeping them on my kitchen counter means that I can grab fresh basil leaves, cilantro, parsley, or thyme on the fly. See all of Ferry Morse's herb seeds here.

Growing

Using a simple seed starter tray, you can sow herb seeds and germinate them rapidly indoors.

Once they germinate and start to show seedlings, they can be easily transferred over to your choice of container. I have an abundance of mason jars in my kitchen, so I typically grab a jar for my herb seedlings.

Cold Weather Tip: Most indoor herbs appreciate having sunlight, but run the risk of getting too cold if they are kept too close to a window. Make sure to give them a few inches of berth from the cold-radiating windows, just to be safe. 


Preservation

You're likely to produce more fresh herbs than you can reasonably eat, so instead of sacrificing your yield to the trash can, try this simple air-drying preservation method. (This method works best for low-moisture herbs like rosemary, oregano, and thyme. Herbs like basil and chives may require a freeze drying method).

Here’s how to do it:

  1. Harvest. Cut the herbs and prune away any dry or wilted leaves.
  2. Rinse. Rinse gently with room temperature water and pat to dry.
  3. Bundle. Gather together several branches and tie them together with string or a rubber band.
  4. Bag Them. Place the bundle of herbs, stem-side up in a paper bag. Tie off the bag with a string or rubber band. Poke a few small holes in the bag.
  5. Store. Store the bag in a dry, warm room.

In as little as 1 week (up to 3 weeks), you’ll have dried herbs that can be stored in air-tight containers and used for up to a year!

Get Cooking!

Follow along with this Basil Pesto Recipe from The Suburban Soapbox.

Basil Pesto is a wonderful way to make use of large amounts basil leaves, uses only 5 ingredients, and can be used for a million different dishes. 

Follow our Recipes Board on Pinterest to see new recipes in your feed.


]]>
https://righttrackwebsolutions.com/blogs/the-greenhouse/20-fresh-and-vibrant-salads-for-thanksgiving 2018-11-19T17:08:00-05:00 2023-09-25T15:20:46-04:00 20 Fresh and Vibrant Salads for Thanksgiving Wayne Griffith More

]]>
Thanksgiving is a time for plates piled high with turkey, stuffing, mashed potatoes, pie, and much more. In short: it's a day of feasting at its finest. But in the mix of all those ultra-comforting side dishes, I also like to include the option for something a little lighter — like a fresh and vibrant salad — to balance out the heartier, heavier dishes. Get Full Article On Kitchn]]>
https://righttrackwebsolutions.com/blogs/the-greenhouse/grapefruit-and-white-beets-with-yogurt-and-tarragon-recipe 2018-11-05T10:21:00-05:00 2023-09-25T15:22:24-04:00 Grapefruit and White Beets with Yogurt and Tarragon Recipe Wayne Griffith More

]]>
Rather than fussily cutting the grapefruit into neat segments, Chef Ignacio Mattos cuts them crosswise into disks; he likes the slightly bitter flavor of the membrane itself.

  • Preheat oven to 350°. Toast pine nuts on a rimmed baking sheet, tossing occasionally, until golden brown, 6–8 minutes; let cool.
  • Increase oven heat to 400°. Place beets on a sheet of parchment paper set on top of a sheet of foil; rub beets with oil and season with salt. Close up parchment and foil around beets. Place packet on a baking sheet and roast beets until tender, 40–50 minutes. Unwrap beets and let cool.


Get Full Recipe on Bon Appétit


Recipe by Christopher Baker

Photos by Ignacio Mattos

]]>
https://righttrackwebsolutions.com/blogs/the-greenhouse/southern-tomato-and-cheese-pie 2018-08-22T11:17:00-04:00 2023-09-25T15:24:02-04:00 Southern Tomato and Cheese Pie Rebecca Sears August is the time of year I've been waiting for - the arrival of the tomato harvest! It's so satisfying to see those pops color throughout the garden, promising delicious fresh salads for the summer and satisfying sauces to take us through the winter. Here's a main dish tomato recipe that celebrates the tasty treat in all of it's glory.

More

]]>
August is the time of year we've been waiting for - the arrival of the tomato  harvest! It's so satisfying to see those pops color throughout the garden, promising delicious fresh salads for the summer and satisfying sauces to take us through the winter. Here's a main dish tomato recipe that celebrates the tasty treat in all of it's glory.

Southern Tomato and Cheese Pie
Adapted from Saveur.com

Ingredients
Pie crust
1 1⁄4 cups all-purpose flour
2 1⁄2 tsp. granulated sugar
1⁄2 tsp. salt
6 tbsp. cold butter cut into 1⁄2-inch cubes
2 tbsp. plus 1 tsp. ice-cold water
1⁄2 tsp. white vinegar
Filling and topping
3 1⁄2 lb. fresh tomatoes (about 12), cored, seeded, and cut into 1⁄2-inch dice, divided
2 tsp. salt, divided
1 tsp. sugar, divided
1 tbsp. butter
1 large yellow onion, thinly sliced
1 tsp. fresh thyme leaves
2 tbsp. extra-virgin olive oil
1⁄4 tsp. freshly ground black pepper
1⁄3 cup packed fresh basil leaves
1⁄2 cup mayonnaise
1⁄3 cup grated fontina cheese
1⁄3 cup grated Parmigiano-Reggiano cheese
2 large heirloom tomatoes, thinly sliced and blotted dry with paper towels

Instructions
Make the pie crust: Place the flour, sugar, and salt in the bowl of a mixer fitted with the paddle attachment. Mix on medium for a few seconds. Begin adding the butter one cube at a time. Continue until the flour is speckled and crumbly, about 4 minutes. With the mixer still running, add the water and vinegar until just combined. Do not overmix. Press the dough into a 6-inch disk, wrap tightly in plastic wrap, and chill in the refrigerator overnight.

Bring the crust to room temperature and lightly butter a 10-inch metal pie pan. Preheat the oven to 400°. Dust your counter and rolling pin lightly with flour and roll the crust slightly larger than your pan. Lay the crust in the pan and press gently into its edges. Cut off the edges that hang over and discard. Freeze for at least 15 minutes.
Lay foil or parchment paper on top of the crust and weigh that down with dried beans or rice. Blind-bake the shell for 30 minutes. Remove the pie weights and foil or parchment and bake 5 minutes more. Set the cooked crust aside as you prepare the filling.

Make the tomato filling: Toss half of the diced tomatoes with 1⁄2 teaspoon salt and 1⁄2 teaspoon sugar. Set them over a colander to drain while you get everything else ready, at least an hour.
Lower your oven to 375°. In a medium sauté pan or skillet, melt the butter and then add the onion and 1⁄2 teaspoon salt. Cook over medium-low heat until deeply caramelized. This will take about 45 minutes.
Toss the remaining diced tomatoes with 1⁄2 teaspoon salt, thyme, and olive oil. Spread in a single layer on a sheet tray with as much room separating the individual pieces as possible. Slide the tray onto the middle rack of your oven and roast for 30-35 minutes. You're looking for the tomatoes to dry out and brown slightly.

Once all the individual components are done, stir together the onion, the fresh and roasted diced tomatoes, the remaining salt, sugar, black pepper, and basil.
Make the topping and finish the pie: In a separate, smaller bowl, stir together the mayonnaise, fontina, and Parmigiano. Spoon the tomato filling into your blind-baked crust. Top with the cheese mixture and heirloom tomato slices. Bake in the middle of your oven for 30 minutes. Delicious!

Chef's tip: If you're short on time you can substitute a store-bought pie crust from the refrigerated section. Blind-bake it as per the recipe to ensure the crust is flaky rather than soggy.

]]>
https://righttrackwebsolutions.com/blogs/the-greenhouse/grilled-sweet-corn-on-the-cob-with-basil-butter-recipe 2018-07-09T09:06:00-04:00 2023-09-25T14:54:45-04:00 Grilled Sweet Corn on the Cob with Basil Butter Recipe Rebecca Sears sweet corn on the cob. While always delicious steamed or boiled, we love it cooked on the grill and then slathered with a fresh basil  compound butter. So good!

More

]]>
One of the many joys of summer is fresh, sweet corn on the cob. While always delicious steamed or boiled, we love it cooked on the grill and then slathered with a fresh herb compound butter. So good!


Grilled Sweet Corn on the Cob with Basil Butter
Serves: 4 to 8

Ingredients
8 ears of fresh sweet corn, shucked
2 sticks unsalted butter at room temperature
1 clove garlic
1 cup fresh basil leaves
1 Tbsp sea salt
Olive oil

Directions

Preheat grill to medium high.

Prep the basil butter: add the basil and garlic to a food processor and chop. Add the butter and 1 Tbsp sea salt and pulse to combine. Scrape down the sides if needed to blend fully. Basil butter can be made ahead and will keep for 1-2 weeks in the refrigerator.

Brush corn lightly with olive oil and sprinkle with salt to taste. When grill is hot, add the corn and close the lid. Using tongs, rotate the corn every couple of minutes until some of the kernels are blistered and the kernels are a bright yellow. It’s ok if some of the kernels are blistered or charred. Total cooking time should be 7-8 minutes. Be careful not to overcook in order to maintain juiciness.

Remove corn from the grill and generously spread on the basil butter. Serve immediately.

]]>
https://righttrackwebsolutions.com/blogs/the-greenhouse/fresh-pea-risotto-with-mint 2018-06-12T15:50:00-04:00 2023-09-25T15:24:32-04:00 Fresh Pea Risotto with Mint Rebecca Sears Fresh garden peas are a wonderful Spring treat, one of the first vegetables to arrive and the first to leaveThis risotto recipe provides creamy comfort alongside the freshness mint and the sweetness of the final pea harvest. Delicious.

More

]]>
Fresh garden peas are a wonderful Spring treat, one of the first vegetables to arrive and the first to leave. This risotto recipe provides creamy comfort alongside the freshness mint and the sweetness of the final pea harvest. Delicious.

Fresh Pea Risotto with Mint
Serves 2

Ingredients

1/2 cup Arborio rice
1/4 white onion, finely diced
1 Tbsp butter
1/4 cup grated Parmigiano Reggiano cheese plus more to garnish if desired
1 ¼ cup fresh garden peas
¼ cup dry white wine
1 ½ cups vegetable stock
Salt and pepper to taste
1 fresh mint sprig
Lemon wedges

Directions

Bring two cups of water to a boil in a medium saucepan. Add the peas and blanch for 2-3 minutes, until bright green. Drain and plunge peas into ice water to cool and stop the cooking process; drain again. Add 1/4 cup of the blanched peas to a blender with 1 tsp of water and pulse into a puree until smooth. Set puree and remaining peas aside.

Add butter to a saucepan pan on medium-low heat and sweat the onions 4-5 minutes until tender and translucent. Do not brown.

Add the Arborio rice to the onion and stir to coat the grains in oil. Stir with a wooden spoon and cook for 2-3 minutes until the grains of rice are completely white. This step toasts the rice for both flavor and texture.

Add the wine to the pan and stir until almost completely absorbed. Add half of the stock to the saucepan and bring to a gentle simmer. Cook risotto while stirring gently for about 20 minutes. Once the rice has absorbed the water and begins to swell, add the remaining liquid gradually, stirring, allowing to absorb before adding more. Season with salt and pepper.

When the rice is tender, add the mint sprig. Remove from the heat and gently stir in the pea puree, remaining peas and ¼ cup grated cheese. Mix through, remove the mint sprig and season to taste with salt and pepper.

Serve into bowls and garnish with lemon wedges and grated Parmigiano Reggiano cheese.

Chef’s note: to retain as much of the pea sugars and freshness as possible, harvest peas shortly before cooking.

]]>
https://righttrackwebsolutions.com/blogs/the-greenhouse/beef-carpaccio-with-arugula-and-parmesan 2018-06-04T12:09:00-04:00 2023-09-25T15:26:29-04:00 Beef Carpaccio with Arugula and Parmesan Rebecca Sears This recipe celebrates the texture and flavor contrasts between high-quality ingredients. The delicate texture of the thinly sliced beef is enhanced when enjoyed with the crunch of the arugula and pine nuts. The acidity of the lemon juice is balanced by the sweet cherry tomatoes, the peppery arugula and rich, salty cheese. 

More

]]>
This recipe celebrates the texture and flavor contrasts between high-quality ingredients. The delicate texture of the thinly sliced beef is enhanced when enjoyed with the crunch of the arugula  and pine nuts. The acidity of the lemon juice is balanced by the sweet cherry tomatoes, the peppery arugula and rich, salty cheese. Serve with a light, fruity red wine to complement the dish.

Beef Carpaccio with Arugula and Parmesan
Serves 2

Ingredients
6 oz Beef Tenderloin (have your butcher slice paper-thin)
2 cups fresh picked baby arugula, washed and dried
4 oz small wedge of good quality Parmesan cheese
2 Tbsp extra virgin olive oil
Juice from 1 lemon
Salt and freshly ground pepper to taste
1/3 cup cherry tomatoes
1/4 cup pine nuts

Directions
Heat a small skillet to medium. Shaking the pan constantly, roast pine nuts until light brown and fragrant, about 2 minutes. Remove from heat and lightly season with salt. Set aside.

Slice cherry tomatoes in half and place in a large bowl. Add arugula to a bowl and toss with olive oil, lemon juice and salt and pepper. Lay arugula mixture on chilled plates. Arrange beef slices on top of arugula mixture.

Using a box grater or vegetable peeler, make thin shavings of Parmesan. Sprinkle Parmesan and pine nuts on top of carpaccio. Serve immediately.


Note: Carpaccio is thinly sliced beef tenderloin, but you can also prepare a carpaccio of any type of meat that is safe to eat raw or cured (such as bison, boar, or duck) or a high-quality fish.

]]>
https://righttrackwebsolutions.com/blogs/the-greenhouse/vitamin-and-antioxidant-packed-fresh-spinach-smoothie 2018-05-23T16:51:00-04:00 2023-09-22T05:53:18-04:00 Vitamin and Antioxidant-Packed Fresh Spinach Smoothie Rebecca Sears Popeye was really on to something! Spinach is a healthy green is full of vitamins, antioxidants and minerals. It's a good source of vitamins A, B2, C and K, and also contains magnesium, manganese, folate, iron, calcium and potassium. Here's a quick and tasty smoothie recipe to enjoy the goodness that spinach has to offer.

More

]]>
Popeye was really on to something! Spinach is a healthy green is full of vitamins, antioxidants and minerals. It's a good source of vitamins A, B2, C and K, and also contains magnesium, manganese, folate, iron, calcium and potassium. That's a long list of good things for one small leaf! Best of all, spinach loves to grow in the cooler Spring and Autumn days when other veggies won't cooperate. Here's a quick and tasty smoothie recipe to enjoy the benefits that spinach has to offer.

Vitamin and Antioxidant-Packed Fresh Spinach Smoothie

Serves 1

Ingredients
1 cup freshly picked baby spinach
1 cup seedless green grapes
1/4 cup coconut milk
1/2 cup ice

Directions
Place the grapes, spinach, ice, and coconut milk in a blender. Blend until smooth and frothy. Enjoy!


]]>
https://righttrackwebsolutions.com/blogs/the-greenhouse/simple-radish-salad 2018-05-11T13:59:00-04:00 2023-09-25T15:27:08-04:00 Simple Radish Salad Rebecca Sears radish. While the radish looks small and sweet, it packs a real palate punch with its crisp crunch and peppery flavor. Here's an easy recipe that celebrates the radish rather than relegating it to a garnish.

More

]]>
One of the delights of Spring is the fast growing radish. While the radish looks small and sweet, it packs a real palate punch with its crisp crunch and peppery flavor. Here's an easy recipe that celebrates the radish rather than relegating it to a garnish.

Simple Radish Salad

Ingredients
2 teaspoons white wine vinegar
2 teaspoons olive oil
1 teaspoon fennel seed
2 teaspoons chopped fresh oregano
1 garlic clove, minced
1 pinch sugar
1 pinch salt
1 pinch pepper
15 -20 medium radishes thinly sliced or shaved
Flat leaf parsley leaves for garnish

Directions
In a small bowl, combine vinegar, oil, fennel seed, chopped oregano, minced garlic, sugar, salt and pepper.

In a large bowl, toss sliced radishes with the vinaigrette mixture.

Cover and refrigerate at least 1 hour before serving. Garnish with fresh flat leaf parsley if desired.

]]>
https://righttrackwebsolutions.com/blogs/the-greenhouse/haddock-florentine 2018-05-07T10:54:00-04:00 2023-09-22T05:56:12-04:00 Haddock Florentine Rebecca Sears This is the time of year when warming days signal cravings for freshly grown vegetables, but cool nights still call for comfort food. This recipe combines cool crop spinach and fresh haddock with a piping hot and creamy sauce. The perfect Spring marriage!

More

]]>
This is the time of year when warming days signal cravings for freshly grown vegetables, but cool nights still call for comfort food. This recipe combines cool crop spinach and fresh haddock with a piping hot and creamy sauce. The perfect Spring marriage!

Haddock Florentine
Serves 6

Ingredients
12 oz fresh baby spinach
2 tablespoons unsalted butter
1 shallot, minced
2/3 cup heavy cream
1 teaspoon kosher salt, divided
3/4 teaspoon freshly ground black pepper, divided
Pinch of freshly grated nutmeg
Pinch of ground cayenne pepper
1 teaspoon paprika
1 (2 1/4-pound) haddock fillet (1 1/2 inches thick), pin bones removed. If you prefer, cod or hake would also work wonderfully in this dish.
1/2 cup Panko breadcrumbs
1/3 cup finely shredded extra sharp cheddar cheese

Directions
Preheat oven to 400°. In a frying pan on medium heat, cook spinach until just wilted. Remove from heat and let stand until cool enough to handle. Drain spinach in colander; squeeze out as much liquid as possible. Transfer spinach to a cutting board, and roughly chop.

Melt butter in a medium saucepan over medium heat. Add shallot; cook 2 minutes until shallot is translucent. Add cream and bring to a boil. Stir in spinach, 1/2 teaspoon salt, 1/4 teaspoon ground black pepper, ground cayenne pepper, paprika and nutmeg. Cook 5 minutes, stirring constantly, until mixture has thickened.

Season cod with remaining 1/2 teaspoon each of salt and pepper, and place in a lightly buttered 2 1/2-quart baking dish. Spread spinach mixture over fish to cover. Combine breadcrumbs and cheese until well blended; sprinkle over top of the dish.

Bake at 400° for 28 to 30 minutes, or until fish is just opaque in thickest part. Cut into portions and serve immediately.

]]>
https://righttrackwebsolutions.com/blogs/the-greenhouse/rhubarb-mint-julep 2018-04-30T12:51:00-04:00 2023-09-25T15:18:00-04:00 Rhubarb Mint Julep Rebecca Sears mint.

More

]]>
mint.

Rhubarb Mint Julep
Makes 8 cocktails

Ingredients:
2 cups (about 3-4 stalks) coarsely chopped rhubarb
3/4 cup granulated sugar
1 teaspoon lemon juice
Fresh mint leaves
1 cup Bourbon
Crushed ice

Directions:
In a saucepan combine the chopped rhubarb and sugar. Over medium heat, stir occasionally and cook until the rhubarb breaks down and the sugar is dissolved. Bring to a boil for 1 minute. Remove from the heat and cool completely. Puree with in a blender. Add the lemon juice and pulse to combine.

To assemble the cocktail, pour about 1oz of the macerated rhubarb mixture into a cocktail glass. Add 2-3 fresh mint leaves and muddle to release the mint essence. Add crushed ice to about 1 inch from the top of the glass. Top off with 2oz bourbon and garnish the glass with fresh mint. Here’s to Spring!]]>
https://righttrackwebsolutions.com/blogs/the-greenhouse/spinach-and-leek-sunday-skillet-egg-breakfast 2018-04-30T12:43:00-04:00 2023-09-25T15:16:47-04:00 Spinach and Leek Spring Skillet Egg Breakfast Rebecca Sears You don’t need to wait until summer to enjoy greens from the garden. Cool season greens like spinach are a delicious Spring treat. Herbs can be grown indoors year-round to add a bit of home-grown flavor and finesse to make an ordinary dish taste extraordinary. Enjoy this Spring Sunday Skillet Egg Breakfast next to a sunny window and dream about what you want to plant next!

More

]]>
You don’t need to wait until summer to enjoy greens from the garden. Cool season greens like spinach are a delicious Spring treat. Herbs can be grown indoors year-round to add a bit of home-grown flavor and finesse to make an ordinary dish taste extraordinary. Enjoy this Spring Sunday Skillet Egg Breakfast next to a sunny window and dream about what you want to plant next!

Spinach and Leek Spring Sunday Skillet Egg Breakfast
Serves 2

Ingredients:
4 eggs
1 Tbs unsalted butter
1 leek, well rinsed, sliced into ¼” rounds using white part only
1 clove garlic, minced
4 cups spinach, roughly chopped
2 Tbs cream or crème fraiche
2 Tbs flat leaf parsley, chopped
Salt and fresh cracked pepper to taste

Directions:
Add butter to cast iron skillet. Heat skillet on medium-high heat. When butter is fully melted and heated through, add leeks to pan. Stir and sauté until beginning to soften, about 3 minutes. Add minced garlic and stir until leeks and garlic are softened but not browned, about one minute. Add spinach to pan and combine. Stir and cook spinach until wilted, about 2 minutes. Drizzle cream or crème fraiche on top of the mixture. Season with salt and pepper to taste and stir to combine. Crack eggs and add to pan to cover spinach mixture. Let cook undisturbed for about 1 minute. When eggs are cooked to desired doneness, season with salt, pepper and chopped parsley.

Serve with slices of toasted crusty bread. Go ahead, dip the bread right in there. Yum!

]]>
https://righttrackwebsolutions.com/blogs/the-greenhouse/easy-peasy-arugula-pizza 2018-03-23T16:34:00-04:00 2022-03-17T17:28:20-04:00 Easy-Peasy Arugula Pizza Rebecca Sears More

]]>

Servings: 6

Ingredients:
3 tablespoons olive oil, plus more to grease pan and brush crust
1 pound pizza dough (homemade or store bought; thawed if frozen)
2 balls fresh mozzarella, thinly sliced
5 sprigs fresh thyme, leaves removed from stems
1/4 teaspoon crushed red pepper flakes
5 cups packed arugula
1/2 fresh cherry tomatoes, sliced in half
1/2 cup freshly grated Parmesan
2 tablespoons fresh lemon juice (about 1/2 a lemon)
zest from 1/2 lemon
1/4 teaspoon salt
1/8 teaspoon cracked black pepper

Directions:
Heat oven to 500 degrees (make sure your oven is clean). Grease a round pizza pan or a 17 x 12-inch rimmed baking sheet with olive oil. Place pizza dough into center of greased pan and press out and flatten dough so it spreads as close as possible to the edge of pan. Work those muscles! A thin crust will be worth it.


Scatter mozzarella slices over dough and sprinkle thyme leaves and crushed red pepper over the top. Brush exposed edge of crust with olive oil. Bake for 15 minutes, until crust is crispy and cheese bubbly. If cheese starts to get too brown, cover center of pizza with foil. I personally love browned cheese and leave uncovered; this is up to your personal taste.


While pizza bakes, toss together arugula, cherry tomatoes, Parmesan, 3 tbsp of the oil, the lemon juice, lemon zest, salt and pepper. When pizza is ready, let cool for about 2 minutes and then top with the arugula mixture. Top with remaining slices of fresh mozzarella, cut into slices and serve. So good!


Products

Thyme Seed

Arugula / Roquette HEIRLOOM Seed

Tomato Supersweet 100 Hybrid Seed

]]>
https://righttrackwebsolutions.com/blogs/the-greenhouse/cheers-to-spring-mixology-with-home-grown-herbs 2018-03-23T16:17:00-04:00 2023-09-25T15:28:37-04:00 Cheers to Spring! Mixology with Fresh Herbs Rebecca Sears More

]]>

Basil Strawberry Rhubarb Sparkler

Strawberry and Rhubarb is a classic combination. Steeping with basil adds a note of complexity to create a wonderful spring cocktail.

Ingredients
1 cup diced rhubarb, from about 2 stalks
1 1/2 cups quartered strawberries
3/4 cup water
1 to 2 tablespoons sugar to taste
Leaves from 1 small bunch basil, small leaves reserved for garnish
1 bottle (750 ml) dry sparkling wine for every 5 drinks

Directions

In a medium saucepan, combine rhubarb, strawberries, water, and sugar over medium high heat. Bring to a boil, then reduce heat and simmer until fruit is tender, about 5 minutes. Remove from heat, add large basil leaves, and let cool completely, about 20 minutes.

When cool, remove and discard basil leaves. Add remaining mixture to blender and blend on high speed until smooth, about 2 minutes. Place 2 tablespoons mixture into each glass, add a small amount of sparkling wine to first loosen purée, then fill glasses with sparkling wine. Garnish each glass with small basil leaves. Delicious!


Shop The Recipe

Strawberries Delizz Plantlings

Basil Everleaf Genovese Plantlings

Basil Sweet Italian (Sow Easy) Seed

]]>